Saturday, March 30, 2013

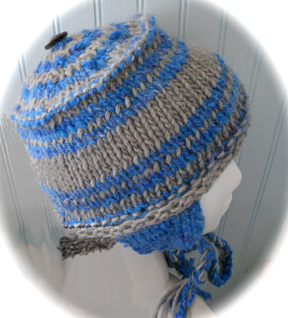
Bulky EarFlap Hat

A FREE pattern as promised. (with thanks to Cathy C.)


Bulky EarFlap Hat for many sizes


This pattern works great for those of you who have leftovers that seem too small in yardage to make something by themselves but still too much to throw away.  The blue (CC) in this hat is hand spun and the grey is natural alpaca/wool (MC) I had sitting around.

A rolled brim, warm earflap hat with braided ties.  Looks great on everyone.
Easy to Intermediate Level Knitting. 
Sizes: 9-12mo (Toddler, Child, Small, Medium, Large)
Fits heads 16”(18, 19, 20, 21, 22) around.
Hat Measurements 15(16.75, 18, 18.75, 20, 21)”
Needles: US 10 / 3.73mm 16” circs plus dpns for ear flaps and crown of hat & baby size.  Or size to make gauge.
Gauge: 3 st/in in st st.  Row gauge not needed as we use inches for lengths.
Notions: Stitch markers
Yarn: Approx 30-55 yds of Main Color (depending on size being worked) of bulky yarn. Contrasting Color will be 35-70yds of bulky.

Ear Flaps
Make two the same.  These will convex curve so that they fit nicely over ears.

Using US 10 dpns cast on 2(3, 3, 2, 3, 3) stitches in CC.
Most rows begin with slip 1 purlwise and end with k thru back loop.

Row 1 (RS): ktbl, k to last st, ktbl
Row 2 WS : sl1p, pbf, purl to last 2st, pbf, ktbl
Row 3 (RS): sl1p,kfb, k to last 2 sts, kfb, ktbl
Cont with rows 2 & 3 until you have 8(9, 11, 12, 13, 14) sts
Work even in stockinette until flap measures 2(2.25, 2.75, 3, 3.25, 3.5)”
    Remember to start each row with sl1 purlwise and end with ktbl.

Hold these 2 cuties on their dpns for a bit later.


Hat Body
Note - If making hat without earflaps – cast on total number of stitches and ignore ear-flap instructions.
1.    With circular needle, and MC cast on using a long-tail stretchy method or a larger needle, 45(50, 54, 56, 60, 63) stitches. Join without twisting and place a Beginning Of Round marker at this point.
2.    Knit around for 3 rounds making a curled edge.

Attaching the earflaps
On the next round, knit 4(5, 5, 6, 7, 7) sts then:
1.    Place one earflap on its dpn behind the circular needle – right side of flap to wrong side of hat both right sides face you as the knitter.
2.    Working in stockinette stitch - work a stitch from each needle together as you would with 1 stitch. (This is similar to working 2 stitches together – EXCEPT each stitch is on a different needle.) You will be joining the hat body to the earflap without increasing any stitches.
3.    Knit another 21(22, 22, 20, 20, 21) sts and then attach the second flap in the same way as the first.  Complete the round.
4.    Work one round in purl using CC. Do not cut off CC. Twist up BOR, pulling taut, until needed.

      Hat sides
Striping Pattern 1: 2 rounds MC, 2 rounds CC, 1 round MC, 2 rounds CC starting just above the purl round then again just before the purl round* near the crown.

Knit around for ~3(3.25, 3.75, 4.25, 4.75, 5) total inches from the garter ridge or desired length before crown decrease.
·       Measure your 7 round striping.  Subtract this number from the total inches for your size. 
At that point work another striping set as follows:
Striping Pattern 2: 2 rounds CC, 1 round MC, 2 rounds CC, 2 rounds MC.
Purl 1 round in CC.

Crown
Can be worked all in MC or concentric circle colors as follows:
*2 rounds MC, 2 rounds CC*  making concentric circles
Round 1 – *K 3(3, 4, 5, 8, 7), sl 1 as to purl, k1, pass slipped st over k st* - Repeat from * to * to complete round.
Round 2 and all even rows: Knit even - no dec.
Round 3 - *K 2(2, 3, 4, 7, 6), sl 1, k1, pass slipped st over k st*.
Round 5 - *K 1(1, 2, 3, 6, 5), sl 1, k1, psso*.
Change to dpns when sts become hard to move around the needle.
Round 7 - *K 0(0, 1, 2, 5, 4), sl 1, k1, psso*.
·       Baby and toddler finish as below.
Round 9 - *K –(-, 0, 1, 4, 3), sl 1, psso*.
·       Child finish as below.
·       Medium – knit one more round even then finish as below.
    Rounds 11 - *K –(-, -, 0, 3, 2), sl 1, psso*.
·       Small finish as below
o   For medium continue until *k1, sl1, psso*
o   For large continue until *k0, sl1, psso*
§  Finish as below.

Finishing
Cut yarn 6 - 7 inches from end of last round, thread an embroidery needle and pull through all remaining stitches twice around – pull taut and then to inside of hat. Knot and weave yarn end in to secure the stitches.

Add Pompom, button or tassel as desired to center crown.

Braids:
Measure out, in both colors, four lengths of yarn each measuring about a yard or meter.   Put a length of each color together and thread between stitches a couple rows up and to the right of center from bottom of one earflap.  Pull through until ends meet each other.  Do this again with another 2 but place it to the left of center. Place the hat on something that will hold it secure and braid the yarns (not tightly) until you have 12 – 15” of cording, incorporating the beginning tail into the braid as far as it will go. Make a knot near the end of this braid then cut the remaining yarn to 2-3 inches long. 
Do the same with the remaining yarn on the other earflap.

Weave in yarn ends and block on a balloon or overturned mixing bowl.
 

© Susan Sarabasha  3/13        sarabasha@earthlink.net   For personal use only.


Wednesday, March 27, 2013

Zentangles


    For the past few years I've been doing more designing of patterns than artwork.  It channels my creativity in more practical ways and is very satisfying.  However I do like to draw, but have been so dissatisfied with my drawings of late I just about stopped.  I mostly did illustration, realism and scientific illustration as I never understood abstract drawing.


During this time I've looked at many 'how to' books but they are all for beginners and seemed too basic for what was needed which was refresher stuff.  Then about a month ago I happened upon Zentangles.
  • (BTW apple and google are not playing nice with each other.  I am writing this blog thru FireFox as somehow, with the last few Safari/OS 10.x updates, the URL link function no longer works on blogspot for me. AAMOF other tools sometimes don't work either.)
I researched it well and decided to download the One Zentangle a Day book onto my Kindle app on my iPad.  It was/is exactly what I have been wanting.  One exercise a day is all that is required, maybe taking a half hour, meditative, non representational yet eductational in terms of light, dark and shading.  I already have all the pens and pencils so it was a relatively easy thing to start doing.
Making the time for myself each morning is the hard part.

The student is slowly worked through exercises and then combination drawings as we go along.  It's meant to be a 6 week course, but since I am sometimes only doing one exercise a day and not the entire chapter my progress is slower.  Actually, I like the fact that it will take more time.

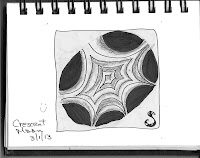
We practice shapes individually.


Then put them together as directed.


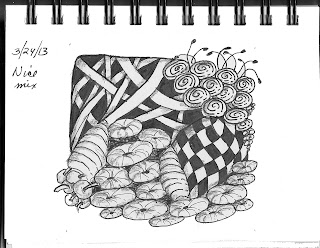
Here's a more recent mix.  Again part of the plan.  It's all about texture, light, dark, shading and deliberate shapes making the whole look 3 dimensional but not of anything truly real.


And this morning I made my very first, on my own, Zentangle,
 using only tangles I have so far learned.  
A sheepy! 
Although I will admit that I started out thinking it might be a bunny but went with the flow.

Sunday, March 24, 2013

Iknitarod Frenzy

I really should have written this at least a week or two ago but got so caught up in the Iditarod, Fantasy Iditarod and Iknitarod that I hardly did any work and mostly did knitting and moderating for 10 days.

Each year we follow this amazing race across Alaska.  Even though I taught it in my classes this was one of the few school related things I kept doing after retiring from middle school.

I also do a special colorway each year commemorating the race.
There's fiber too.

During the race, on Ravelry, those of us in the Iknitarod choose something challenging to spin &/or knit.  This year I chose to knit a sweater for wool-aid.org.

My challenge was to complete the Scrap Shawl Collared Sweater, and if time, a matching hat.  I used Knit Picks Wool of the Andes, bulky and some hand dyed hand spun I just happened to have in my burgeoning stash.


ready to split for the front and back


shawl collar in process.  Very different construction than I am used to but it worked great.


On to the sleeves.


Sleeves done and 2 ear flaps.

Basel was not pleased.  I finished my challenge in a little over 9 days, on the same day that about 25 mushers came under the burled arch in Nome.
I am in process of writing out this hat pattern and will offer it for free very soon.


Friday, March 1, 2013

Heirloom Shawl

Sadly, the more design work I get the less I actually am able to share with you publicly as I work on the garment.  However there comes a time, with each one accepted, that it's published and I get to jump up and down and say, "Look!  Look!  Look!"

               I just adore the photography that XRX does for its books and its Magazine. Don't you?.

So I present to you the third design of mine published by Knitters Magazine, in K110 Spring.


Late last night I received this message on Ravelry.


Yowza!  That sure is expensive.  Rick M, at Knitter's, chooses the yarn and sends it to me.  I have no input into the yarn used, the color or any idea how much a skein might cost and haven't even looked it up in the past.  Guess I will now.

I wrote back to her suggesting an alpaca blend in a steely grey might do the trick.  OR maybe a qiviut blend that would merely cost $300. aiyiiiii

I do wonder how I would've felt knowing $600 worth of yarn was in my hands or bag while working on it at home and anywhere I could find a quiet spot, like Panera's in the afternoon. We all know qiviut is expensive but, I guess I never followed through on just how expensive.  Not knowing was better as I might have gotten weird and handled it differently. Maybe sweating with nervousness or guarding it too closely.  The yarn knitted up beautifully, never fraying or giving any trouble and was definitely a pleasure to cuddle and hold.  And in retrospect, a treasure too.