
Bulky EarFlap Hat for many sizes
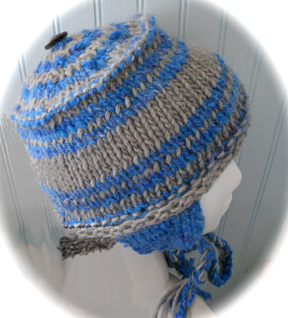

This pattern works great for those of you who have leftovers that seem too small in yardage to make something by themselves but still too much to throw away. The blue (CC) in this hat is hand spun and the grey is natural alpaca/wool (MC) I had sitting around.
A
rolled brim, warm earflap hat with braided ties. Looks great on everyone.
Easy
to Intermediate Level Knitting.
Sizes:
9-12mo (Toddler, Child, Small, Medium, Large)
Fits
heads 16”(18, 19, 20, 21, 22) around.
Hat Measurements 15(16.75, 18, 18.75, 20, 21)”
Needles: US 10 / 3.73mm 16” circs plus dpns for ear
flaps and crown of hat & baby size.
Or size to make gauge.
Gauge: 3 st/in in st st. Row gauge not needed as we use inches for lengths.
Notions: Stitch markers
Yarn: Approx 30-55 yds of Main Color (depending on size being worked) of bulky
yarn. Contrasting Color will be 35-70yds of bulky.
Ear Flaps
Make
two the same. These will convex curve
so that they fit nicely over ears.
Using
US 10 dpns cast on 2(3, 3, 2, 3, 3) stitches in CC.
Most
rows begin with slip 1 purlwise
and end with k thru back loop.
Row 1
(RS): ktbl, k to last st, ktbl
Row 2
WS : sl1p, pbf, purl to last 2st, pbf, ktbl
Row 3
(RS): sl1p,kfb, k to last 2 sts, kfb, ktbl
Cont
with rows 2 & 3 until you have 8(9, 11, 12, 13, 14) sts
Work
even in stockinette until flap measures 2(2.25, 2.75, 3, 3.25, 3.5)”
Remember to start each row with sl1 purlwise and
end with ktbl.
Hold
these 2 cuties on their dpns for a bit later.
Hat Body
Note - If making hat without earflaps – cast on
total number of stitches and ignore ear-flap instructions.
1. With circular needle, and MC
cast on using a long-tail stretchy
method or a larger needle, 45(50, 54, 56, 60, 63) stitches. Join without
twisting and place a Beginning Of Round
marker at this point.
2. Knit around for 3 rounds
making a curled edge.
Attaching the earflaps
On
the next round, knit 4(5, 5, 6, 7, 7) sts then:
1. Place one earflap on its dpn
behind the circular needle – right side of flap to wrong side of hat both right
sides face you as the knitter.
2. Working in stockinette
stitch - work a stitch from each needle together as you would with 1
stitch. (This is similar to working 2
stitches together – EXCEPT each stitch is on a different needle.) You will
be joining the hat body to the earflap without increasing any stitches.
3. Knit another 21(22, 22, 20, 20,
21) sts and then attach the second flap in the same way as the first. Complete the round.
4. Work one round in purl using
CC. Do not cut off CC. Twist up BOR, pulling taut, until needed.
Hat
sides
Striping Pattern 1: 2 rounds
MC, 2 rounds CC, 1 round MC, 2 rounds CC starting just above the purl round
then again just before the purl round* near the crown.
Knit around for ~3(3.25, 3.75,
4.25, 4.75, 5) total inches from the garter ridge or desired length before
crown decrease.
· Measure your 7 round
striping. Subtract this number
from the total inches for your size.
At
that point work another striping set as follows:
Striping Pattern 2: 2 rounds CC, 1 round MC, 2 rounds CC, 2 rounds MC.
Purl 1 round in CC.
Crown
Can be worked all in MC or concentric circle colors as follows:
*2 rounds MC, 2 rounds CC* making concentric circles
Round 1 – *K 3(3, 4, 5, 8, 7), sl 1 as to purl, k1, pass slipped st
over k st* - Repeat from * to * to complete round.
Round 2 and all even rows: Knit even - no dec.
Round 3 - *K 2(2, 3, 4, 7, 6), sl
1, k1, pass slipped st over k st*.
Round 5 - *K 1(1, 2, 3, 6, 5), sl
1, k1, psso*.
Change to dpns when sts become hard to move around the needle.
Round 7 - *K 0(0, 1, 2, 5, 4), sl
1, k1, psso*.
· Baby and toddler finish as
below.
Round 9 - *K –(-, 0, 1, 4, 3), sl 1,
psso*.
· Child finish as below.
· Medium – knit one more round
even then finish as below.
Rounds 11 - *K –(-, -, 0, 3, 2), sl 1, psso*.
· Small finish as below
o For medium continue until *k1,
sl1, psso*
o For large continue until
*k0, sl1, psso*
§ Finish as below.
Finishing
Cut yarn 6 - 7 inches from end of last round, thread an embroidery
needle and pull through all remaining stitches twice around – pull taut and
then to inside of hat. Knot and weave yarn end in to secure the stitches.
Add Pompom, button or tassel as desired to center crown.
Braids:
Measure out, in both colors, four lengths of yarn each measuring about
a yard or meter. Put a
length of each color together and thread between stitches a couple rows up and
to the right of center from bottom of one earflap. Pull through until ends meet each other. Do this again with another 2 but place
it to the left of center. Place the hat on something that will hold it secure
and braid the yarns (not tightly) until you have 12 – 15” of cording,
incorporating the beginning tail into the braid as far as it will go. Make a
knot near the end of this braid then cut the remaining yarn to 2-3 inches
long.
Do the same with the remaining
yarn on the other earflap.
Weave in yarn ends and block on a balloon or overturned mixing bowl.

No comments:
Post a Comment